Pages

Showing posts with label iOS Data Recovery. Show all posts

Wednesday, October 19, 2016

Recover Lost Contact from iPhone 7/Plus

As so many people are tend to keep the Contact on their iPhone 7 or iPhone 7 plus, there is great possibility that the Contact can get lost due to mistaken deletion, new iOS 10 update, or device crash etc. What if you have no available backup but you still want to retrieve the deleted Contact? Here is an iPhone Contact Recovery software that can recover deleted Contact from iPhone without any backup. 

---Top 10 Best iPhone Data Recovery Software Reviews 

System Requirements 
- Supported OS: Windows 10/8.1/8/7/Vista/XP 
- CPU: 1GHz (32 bit or 64 bit) 
- RAM: 256 MB or more of RAM (1028MB Recommended) 
- Hard Disk Space: 200 MB and above free space 
- iOS: iOS 10 and former 

Below are some simple steps from the iPhone data recovery tool to show you just how easy it is to use, you can try them respectively on your computer: http://www.hivimoore.com/2015/10/recover-deleted-contacts-text-message-on-iphone/ 

Now, free download the best iPhone/iOS 9 Data Recovery software on your Windows or Mac, then install and run it on your computer: 

Download Windows | Buy Windows 

Download Mac | Buy Mac 

Method 1: How to Recover Contacts from iPhone 7 Directly 

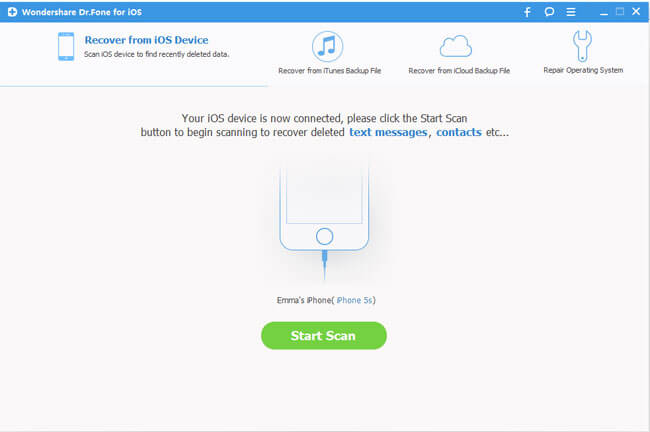
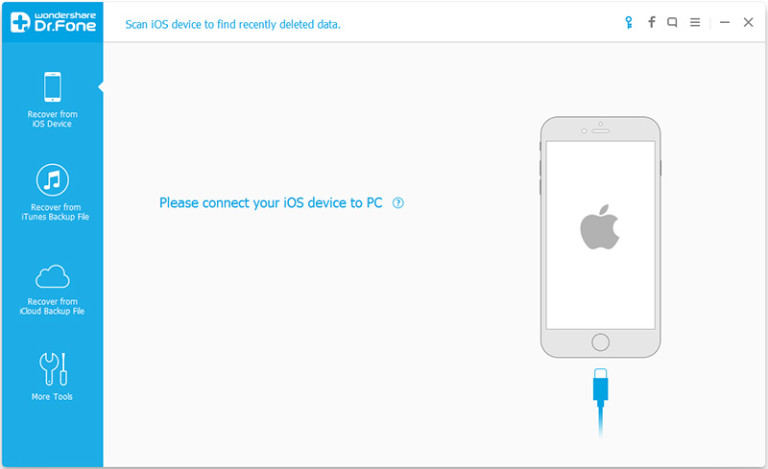
Step 1. Connect your iPhone 7 to Computer 

Connect your iPhone 7 device with your computer via USB cable after running the iPhone Data Recovery tool on your computer. 


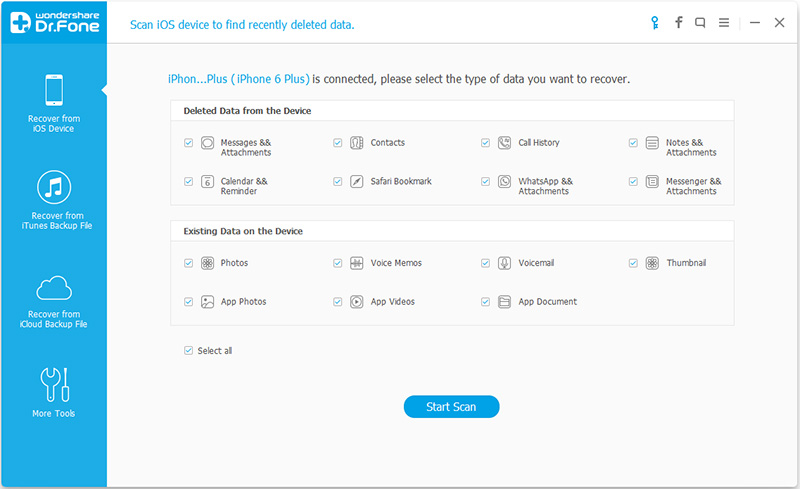
Step 2. Scan your iPhone 7 Device for Lost Contacts 

Once your iPhone 7 is recognized, you can see the information of your device on the primary window, now you can select contacts you want to recover and click "Start Scan" button to let the program analyze and scan the data from your iPhone 7. 

 
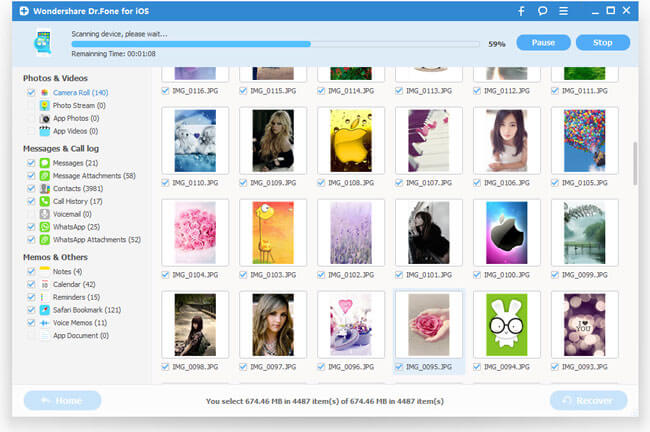
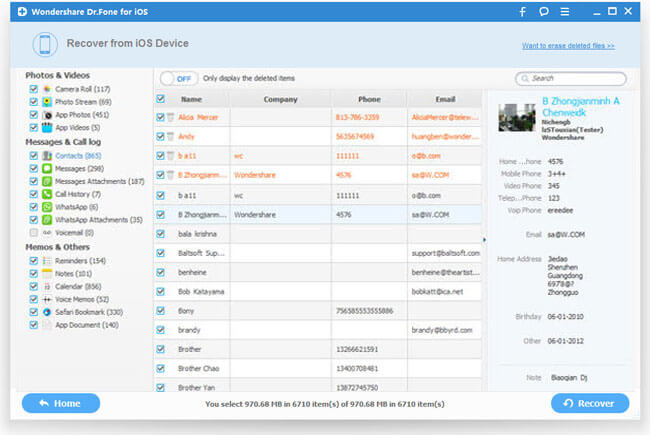
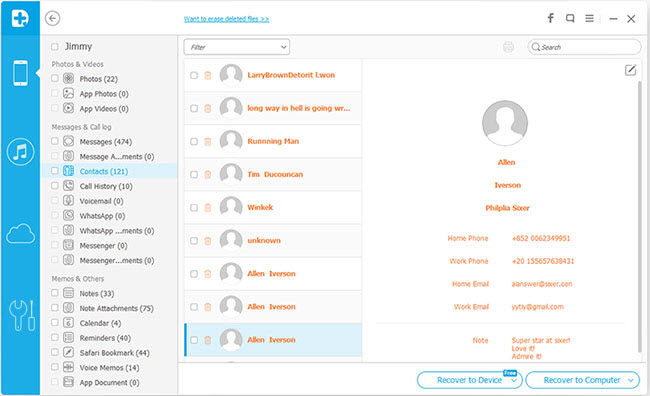
Step 3. Preview and Restore Deleted Contacts from iPhone 7 

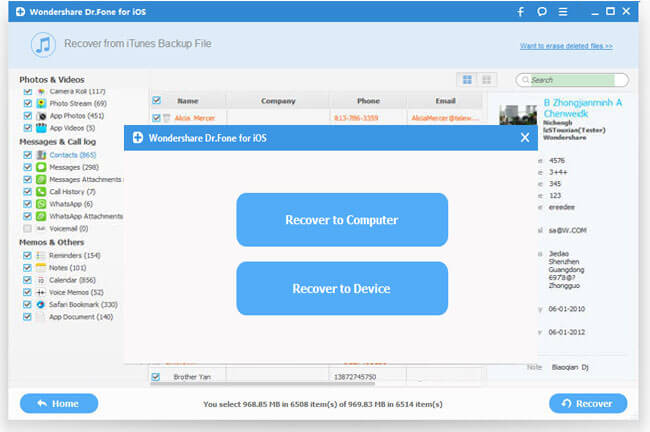
After scanning, it will display all found data and files in categories as below. You can choose the deleted contacts and then restore them to computer by clicking "Recover to Device" or "Recover to Computer" button. 


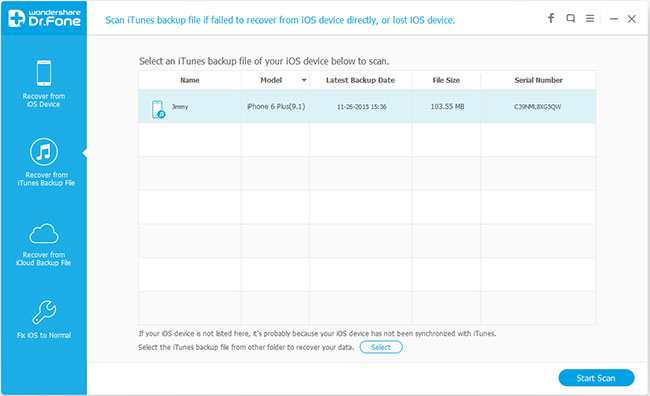
Method 2: How to Restore iPhone 7 Lost Contacts from iTunes Backup 

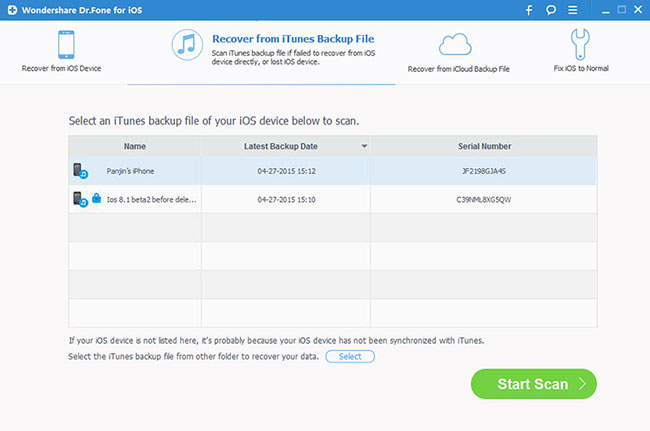
Step 1. Run the Program and Select the Recovery Mode 

Here you should choose "Recover from iTunes backup file" mode. Then let's click "Start Scan" button and go on. 


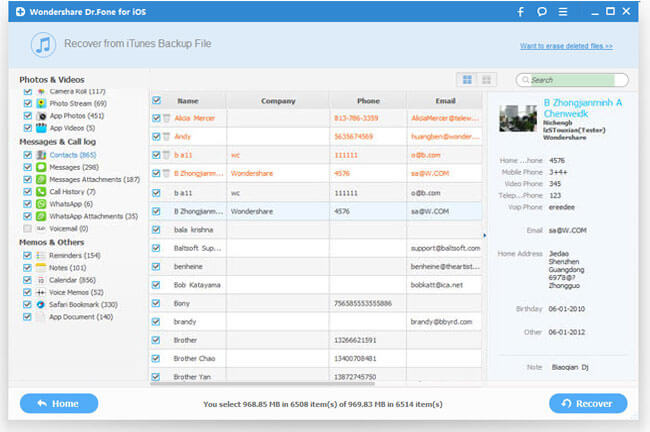
Step 2. Extract iTunes Backup to Recover Contacts from iPhone 7 

After the scanning, all the contents in the previous backup file will be listed as you can see. you can recover photos, videos, notes, call history, test messages, etc. from your iTunes backup. In order to retrieve contacts from iPhone, please select "Contacts" and click the "Recover to Computer" button to save it on your PC. 


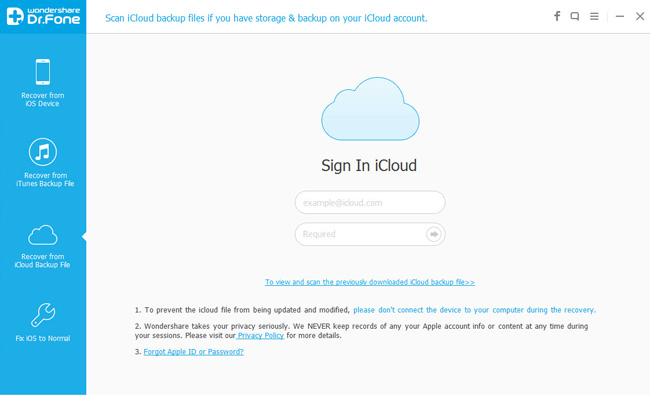
Method 3. How to Retrieve iPhone 7 Contacts from iCloud Backup 

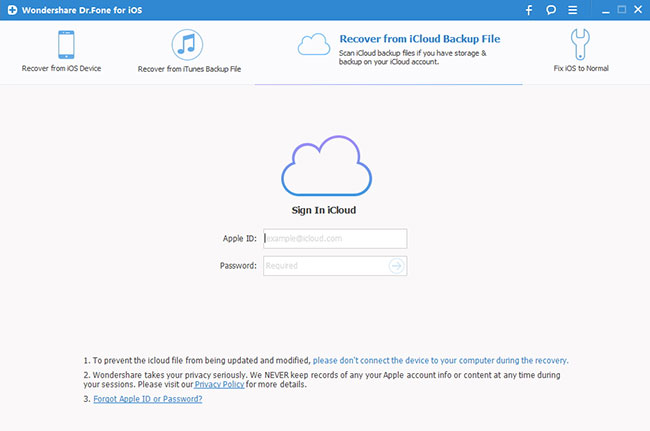
Step 1. Launch the program and sign your iCloud account 

First of all you need to launch the iPhone Data Recovery program on your computer, Then choose "Recover from iCloud Backup File" mode, then sign in your Apple ID and password to access to your iCloud account. 


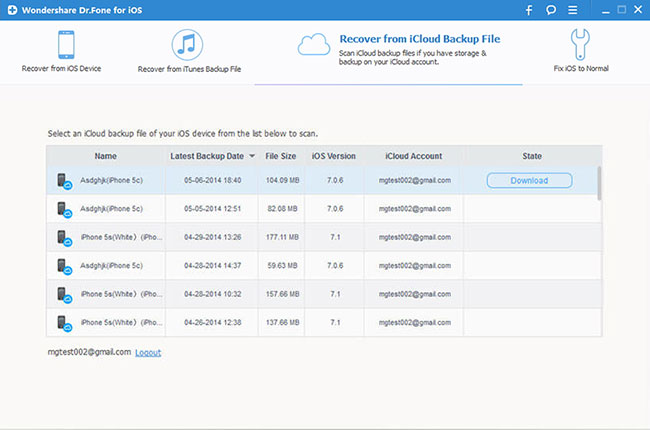
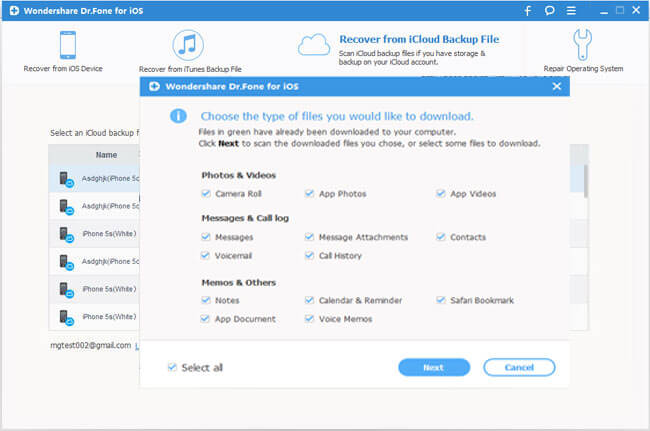
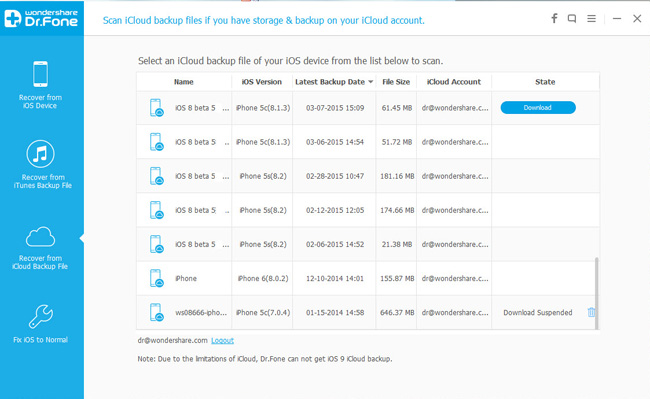
Step 2. Download iPhone 7 Data from iCloud Backup 

When you choosing the mode of "Recover from iCloud Backup File", the files of your iCloud backup account will found and displayed in order automatically. Choose the file you want to restore and click "Download" button. 


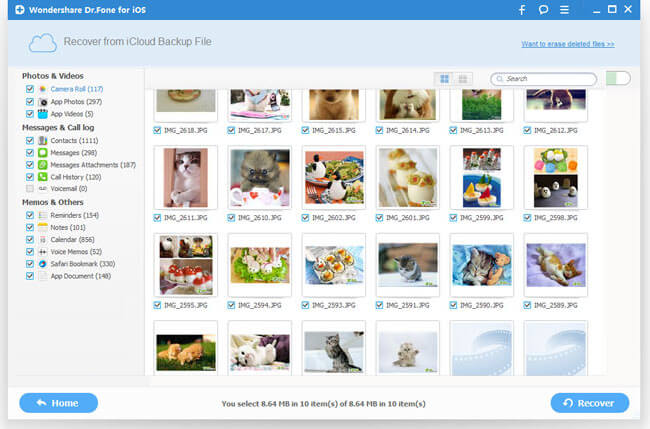
Step 3. Preview and Restore iPhone 7 Contacts from iCloud 

After the scanning, you will see all the data, such as contacts, photos, text messages, notes, videos, etc., then choose the data you wanna recover, and click on the "Recover" button to save them on your computer or your iPhone 7 device with one click. 


For iPhone, iPad, iPod touch series users, it meets all their needs so that they don't have to bother themselves with all deleted files. Besides contacts, you also can retrieve deleted text messages, call history, notes, photos, videos, whatsapp and so on by using this iPhone Data Recovery program. 

Editor's Recommendation: 


Source: http://www.hivimoore.com/2015/10/recover-deleted-contacts-text-message-on-iphone/

Thursday, May 12, 2016

Recover Lost Data from iOS 9 Devices with iOS Data Recovery

Are you can't wait to upgrade your iPhone to the iOS 9? That must be great. However, data loss is one of the most common issues after updating to the new iOS 9, and it is always too late to regret never backing up data in iTunes or iCloud. Here we introduce you the three iOS Data recovery modes.

How to Retrieve Lost Data from iOS 9 Devices

"I committed a mistake of not taking a backup of my iPhone data before updating to iOS 9, so when after the iOS update I have lost all my photos, videos, everything. Need desperate help!"

Inherit to iOS 8, iOS 9 is different from previous iOS 8, increased a lot of unexpected new features, get the iPhone users better upgrade experience. However, iPhone system upgrade often will bring certain negative influence to the users, the most direct performance is the loss of iPhone data.

So is there a reliable solution to restore lost data without backup after iOS 9 upgrade? Yes, of course. To get lost data back from iPhone, you can use a profesional iOS Data Recovery. Wondershare Dr.Fone for iOS can help you easily to restore lost data, it offers three reliable and high-efficient ways to recover lost or deleted data from iOS 9 devices. If lost data on your iPhone, please don't use your device again, then all you need is the Wondershare Dr.Fone for iOS software, you can get all lost data from iPhone.

Buy the way, the best iOS Data Recovery can recover all kinds of lost files from iPhone, including Photos, Videos, Music,ContactsText Messages, iMessages, Call History, Calendar, Notes, Call logs, Whatsapp, Voice Memos, iBooks reading etc. What’s more, this iOS Data Recovery supports recover lost data from iPhone 6s/6s plus, iPhone 6/6 plus, iPhone SE, iPhone 5S , iPhone 5C, iPhone 5, iPhone 4S/4 and the New iPad, iPad Pro, iPad mini 4, iPad 4/3/2/1 & iPod touch 5.


Here we introduce you the three recovery modes:
  1. Recover from iOS Devices directly;
  2. Recover from iCloud backup;
  3. Recover from iTunes Backup.
Now, download and install the top-ranked iOS Data Recovery. The installation process is easy to do and it lasts a few minutes.


Method 1. Recover your data directly from iOS 9 device

Step 1.  Connect your smartphone to a computer and lunch the iOS Data Recovery. You will be informed that your iPhone is connected and you will be able to see the model (iPhone 5, 6 and etc.).

How to Retrieve Lost Data from iOS 9 Devices

Step 2. Click "start" and the software will scan your device for lost files. When it is done, you will see the list of all files, the iOS Data Recovery can restore. The list includes messages, videos, call history, photos and a lot more.

How to Retrieve Lost Data from iOS 9 Devices

Step 3. All you need to do is to choose files you want to restore. Remember that checked files will be restored. Also, you can see additional information about those files. Now, click on "recover" and you are done. It usually takes a few minutes and you are done.

Method 2. Selectively recover iOS 9 data from iCloud backup

Step 1. You can also use the iOS Data Recovery to recover your data from iCloud. Connect your iOS device with your computer and launch the best iOS Data Recovery. Sign in to your iCloud account. You should know that your apple ID and password are protected and nobody can know them.

How to Retrieve Lost Data from iOS 9 Devices

Step 2. The software will find all iCloud backups you saved. All you need to do is to hit the download button and download them to your computer. It is recommended to download the latest backup and the one with most files. When the download is complete, click on the same button to extract files.

Step 3. During the process, you can preview certain files. All data, found in the iCloud backup can be restored. If you don’t want to restore certain messages or files, just uncheck them. Remember that downloading and extracting time depends on a size of the backup. If you don’t have enough time, or your internet connection is slow, uncheck files you don’t want to recover. When you are done, just click on "recover" and wait for the Wondershare dr.fone for ios to complete the process.

How to Retrieve Lost Data from iOS 9 Devices
Method 3. Selectively recover iOS 9 data from iTunes backup
Step 1. The best iOS Data Recovery has another option for restoring your data. It is restoring from iTunes backup. The procedure is very simple and similar to previous alternative. Connect your device with your computer and launch the iOS Data Recovery. Choose "Recover from iTunes backup file" and the program will show you all backups that are available.

How to Retrieve Lost Data from iOS 9 Devices

Step 2. Choose the backup file you want and click on "Start scan". After the scan is complete, you will have a complete list of files that are available for recovering. All files will be divided in categories. For most users restoring messages, call history, photos and videos is the most important. Luckily, all of these categories are supported.

How to Retrieve Lost Data from iOS 9 Devices

Step 3. Now, you can select files you want to recover. If you want to recover all files, just check all categories where the files are and click on "recovery" button. Recovering usually last several minutes. When it is done, you will have your data in your computer. If you need a specific file, you can use "Search" option. In addition, you must remember not to disconnect a device while recovery is in progress. Only when it is done, you can disconnect your device from a computer.

Now, there is no need to feel depressed any more. You can choose different versions according to your computer’s operation system, just get more detail information from here: iOS Data Recovery for Windows or Mac. Simply download the free version or buy it and have a try.

Download Mac            |           Buy Mac

Have something to say about this "How to Retrieve Lost Data from iOS 9 Devices" tutorial? Share your comments below!

Related Articles

Thursday, June 18, 2015

Best iOS Data Recovery Review - Wondershare Dr.Fone for iOS

Panicked due to deleting text messages, photos or other data by accident from your iPad, iPod touch or your iPhone? Did you damage or break your iPod touch or iPhone, which had important data on it? Has your data been removed because of a failed update? Get the doctor in. Wondershare Dr.Fone for iOS is a user-friendly tool that helps you restore videos, photos, text messages, contacts, voicemail, memos, call logs and calendars. Even WhatsApp messages, Safari bookmarks get returned to their rightful place on your iDevices(iPhone 13iPhone 12, iPhone 5S/5C/4S/4, iPod 6/5/4, iPad Air, etc.). How is that possible? It requires just three easy steps. You can review the files you lost and then recover them just like that.


Dr.Fone for iOS has 3 recovery modes:

1. Direct recovery from the iOS Device - Get your data back from iPhone 13iPhone 12, iPad 9, iPod touch 7, iPad mini 1/2/3/4/5/6/7, iPad Air 1/2/3/4/5, and more.

2. iTunes backup recovery mode - Use your iTunes backups to recover the data to your iDevices.

3. iCloud Backup recovery mode - Use your iCloud Backup to recover the data to your iDevices. Recover up to 12 different file types from any supported iOS device. Any file types that can be directly recovered from an iOS device, check below: 7 Types of Files (iPhone iPhone 6s plus/6s, iPhone 6 plus/6/5S/5C/5/4S/iPad mini/iPod touch 5) : Safari Bookmark, Messages, Reminders, Notes, Call History, Contacts and Calendar. 12 Types of Files (iPhone 3GS/4, iPad 1, iPod Touch 4G) : Voice memos, Safari bookmark, Reminder, Notes, Calendar, Call history, Message attachments, Messages, Contacts, Photo Stream, Camera Roll Videos and Camera Roll Photos.

Key Features:

1. Directly Recover Data from iPhone, iPad & iPod touch.

2. Extract iTunes Backup for all iOS Devices, including iPhone SE, iPhone 6s/6s Plus, iPhone 6/6 plus.

3. Preview What You've Lost before Recovery.

4. Re-sync Recovered Data to Your iOS Device. All Devices Supported: iPhone 6s plus/6s, iPhone 6/6 Plus/5S/5C,iPhone 5, iPhone 4s, iPhone 4, iPhone 3GS, iPad 1, iPod touch 4, Only for the recovery mode of Recover from iTunes Backup File : iPhone 5/4S Data Recovery, iPhone 3G Data Recovery, iPad 2 Data Recovery, New iPad Data Recovery. All Files Supported: Contacts, Photos, Videos, Messages, iMessages, Music, Call History, Notes, Calendar, Voice Memos, Recover Reminders, Safari Bookmarks.

5. Fix the Operating System of iOS Devices. When your iPhone, iPad or iPod touch stuck in Recovery Mode, stuck on Apple logo, or just perform abnormally, you can use Dr.Fone's outstanding Repair Operating System feature to have it fixed with less than 10 minutes.

With the new version of Dr.Fone for iOS, you can already recover data directly from iPhone 6s plus/iPhone 6s/iPhone 6 (Plus)/5/5S/5C/4S. Currently 7 file types are supported by this recovery mode, including messages, contacts, call history, calendar, notes, reminders, whatsapp and safari bookmark. It's easy-to-use software with nothing complex involved. Even an average person with the knowledge of using a personal computer can use this software with ease. It takes about 4 to 6 minutes for Dr. Fone to retrieve about 2 gigabytes of data.

Download it now, there is a trial version that you can extract and preview all the content in details.


Go to iOS Data Recovery for Mac


Below are three methods by which one can retrieve lost data, which are:


Method 1: Directly Recover Lost Data from iPhone 6s plus/6s/6 Plus/6

Note: Before proceeding to the below mentioned steps, make sure that your device is charged up to 50% to ensure no breaks whatsoever.

Step 1: After download, install and launch the best iPhone 6s plus/6S data recovery on your computer. Connect your iPhone 6s plus/6s to computer via the provided USB cable and allow the application to automatically detect your device. If your device is not detected, make sure your USB cable is functioning accordingly and is properly inserted in the ports.

Select "Recover from iOS device", then you'll see an interface which informs you that your device is connected. Click "Start Scan" to continue.


Step 2. Go to Computer and find the flash drive. Open it and contents on SD card show up in front of you.


Step 3. After the scan is complete, the application window will show you a list of both existing and lost data in your iPhone 6s plus/6s. There stays an option to only display deleted items in the application. You can also search for lost data by mentioning its name in the search bar provided.


Step 4. Place a check mark alongside the data you require and then click the "Recover" button allowing the data to be saved by default on your computer. For data involving iMessages, notes or contacts, there will be an option popping up asking whether to save the data on your pc or directly in your device.


Method 2: Recover Data from iTunes backup

Step 1. Launch the best iPhone Data recovery tool and select recovery from iTunes backup. The applications inbuilt iTunes recovery backup tool will detect all iTunes backup files present. Select the appropriate iTunes backup file that you want to recover your data from.


Step 2. Initiate the "Start Scan". It is advisable to be patient while the scan occurs.


Notes: Please do not sync your iPhone 6s plus/6s with iTunes when using the best iPhone Data Recovery program. It is easily to overwrite your lost files.

Step 3: After the scan is complete, you'll be provided with a list of all the data extracted from the backup file. Scroll through the data and select those you wish to recover. Contacts, messages and data like notes can be recovered directly to your iPhone.


Method 3: Directly Recover Deleted Data from iCloud Backup

Step 1. Open the top-ranked iOS Data Recovery, and switch to the recovery mode of "Recover from iCloud Backup File" on the top of the program's window. Then log in your iCloud account id and password.


Step 2. Once you provide the required details and successfully login into your account, the application presents all the iCloud backup files linked to your account. Browse from the list and select the one from which you want to recover your data from and hit "Download".


Step 3. In order to reduce downloading time, the Dr.Fone allows you to select specific files of your interest rather than downloading the entire file.


Step 4. After the required files are downloaded, you can browse through them and tick mark the data you want. The data will be saved either on your pc or directly on your iPhone 6s plus/6s depending upon your decision.


Note: If you use a Mac, please free download and operate the similar steps as above.

Conclusion

The company offers a fully functional free trial of this iPhone recovery tool, which ensures that customers are confident in their selection of Dr. Fone before investing in a copy for themselves. In addition to the free trial, the manufacturer also offers a 30-day money back guarantee (with some restrictions) to all who purchase the software. Once you purchase the software, Wondershare offers live-chat technical support, available 24 hours a day. This is important in the event you run into any usability issues while performing data recovery on your iOS device.

Now, download iPhone Data Recovery program to have a try!


More Popular Topics: